
Documentation
A module-by-module guide to the panel; sections are listed in the index on the left.
1. Getting Started
Creating an Account and the Demo
Create your account on the Sign Up screen with your first name, last name, agency name and email. After you confirm the verification link sent to your email, you can sign in. Then pick your plan (monthly or yearly) and verify your card on the iyzico secure payment page (1 ₺ is charged and refunded immediately), and your 30-day free trial begins: every feature of the chosen plan is unlocked, and you can switch plans for free during the trial. The first payment is taken when the trial ends, with a reminder 3 days before; if you cancel before the trial ends, you are not charged. You can also sign up and sign in with your Google account. To explore without entering a card, use the Quick Demo on the home page.
Plans
- Basic — single user; property, listing, customer and task management.
- Pro — 5 users; adds approval workflows, the contract wizard, income/expense, reports and team management.
- Pro+ — 15 users; adds the agency website, Sahibinden, Hepsiemlak and Emlakjet integration, bulk email marketing, CSV import/export and the WhatsApp Business API.
- Max — unlimited users; adds panel access from your agency website address, 20+ domestic / international platform integrations, API access and a free small custom development each month.
Pro Assistant is included in every plan; its daily allowance grows with the plan. The panel and this guide are available in Turkish and English.
When your trial ends, your data is not deleted; once you pick a plan you continue where you left off. For a plan comparison, see the Pricing page.
Recommended First Setup
- Complete your agency name and tax details under Settings → Agency Information.
- Under Settings → Financial Settings, decide whether you will use foreign currencies; if so, choose your TCMB (Central Bank of Turkey) rate type.
- Invite your team members and assign their roles (Section 12).
- If you will use approval workflows, configure the Workflow Settings (Section 11).
- Enter your first property record (Section 3).
2. Overview (Panel)
After you sign in, the landing screen is the Overview. At the top are Daily / Weekly / Monthly / Yearly period tabs; all cards and charts refresh for the selected period.
- Stat cards — summaries of total/active listings, sold, rented, customers, contracts and income.
- Customer and Contract Trend — a line chart of new records in the period.
- Portfolio Breakdown — a pie chart by property type; hover over a slice to see the type name and count.
- Latest Property Listings — the most recent records added to the portfolio.
- Portfolio gallery and Portfolio map — your records with their photos and on a map.
- Today's calendar — today's tasks and appointments.
- Quick Actions — one-click shortcuts to the new property, customer, contract and income/expense forms.
- Edit Layout — personalizes the position/visibility of cards and charts; your preference is saved to your account.
The top bar has global search (title/name search across all modules — press Enter to go to the results page), the TCMB exchange rate strip (USD/EUR/GBP; based on the rate type in Settings) and the bell (Approval Center). Light/dark theme is chosen under Settings > My Account.
The left menu is collapsible: the arrow button on its top right edge or Ctrl+B shrinks it to icons only, and expands it again. While collapsed, hovering an icon shows its name, and for items with a submenu the sub-links open beside it; the agency name appears in the top bar. Your choice is remembered; if you have not chosen, the menu starts collapsed on narrow screens. Guide and Support links sit at the bottom of the menu.
2.1. Pro Assistant
Pro Assistant is the AI helper in the panel. Open it with the floating Assistant button in the bottom right corner or with Ctrl+K; it works by text or voice without leaving the page.
If the button covers something, press and drag it elsewhere on the screen. To hide it completely, drop it on the × target that appears in the middle of the right edge while dragging, or press the × that shows on its corner when you hover it. While hidden, a small tab stays on the right edge: the mascot opens the assistant and the arrow brings the button back to its place in the bottom right. Ctrl+K works while the button is hidden too.
What Can It Do?
- Answer queries — customers, portfolio, tasks and appointments, the lead pipeline and period summaries. For example: "My rental flats in Kadıköy", "What are my appointments this week?".
- Fill in forms for you — say "New customer: Ayşe Kaya 0533 222 33 44, looking for land to buy" and the customer form opens already filled in; the same applies to properties, tasks and appointments.
- Open the right page — takes you to panel pages such as reports, the calendar or customers.
- Answer how-to questions — explains how a feature works, based on this guide.
Nothing is saved on its own. The assistant fills in the form; you check the fields and save the record yourself.
Using Your Voice
- Press the microphone button and speak; this uses your browser's speech recognition and needs microphone permission.
- You can pause to think: your message is sent about 2 seconds after you stop speaking. Press the microphone button again to finish early.
- Use the voice reply button to have the assistant read its answers aloud.
- The Fill in the form by voice card on the customer, property and task forms opens the assistant ready to listen.
Allowances and Privacy
- Each plan has daily, weekly and monthly allowances; the daily figures are in the Pricing table. The daily allowance renews at 00:00, the weekly one on Monday and the monthly one at the start of the month.
- The assistant only sees your agency's data; what you write is kept for 90 days.
- Quick Demo runs the free public assistant; the allowance is counted per person rather than per agency, and it only sees demo data.
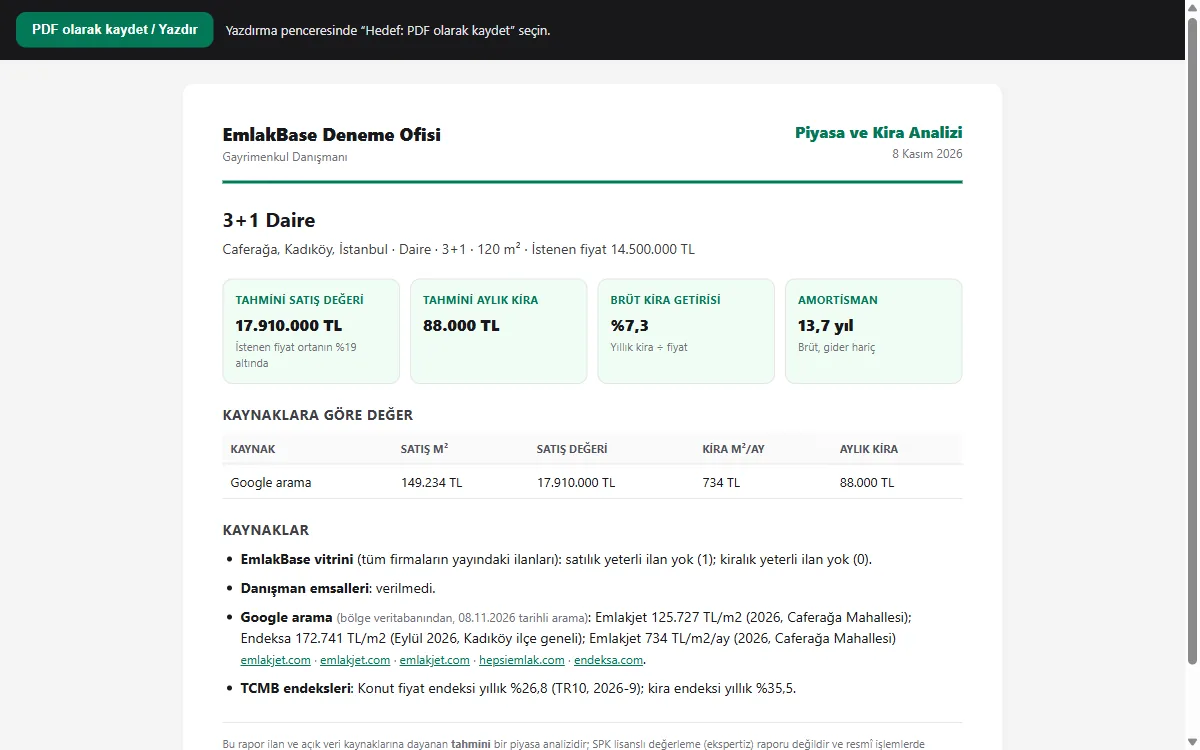
2.2. Market and Rent Analysis (PDF Report)
Ask the Pro Assistant for a market analysis of a flat or a portfolio record. For example: "Run a sale and rent analysis for a 3+1, 120 m² flat in Moda, Kadıköy" or "Prepare a market analysis for this property".
What Does It Calculate?
- Estimated sale price range and monthly rent range.
- Gross rental yield and payback period (in years).
- If you give an asking price, where that price sits in the area (below, in line with or above the market).
Sources
- EmlakBase showcase: live listings of all agencies (same district; the province if there are too few).
- Google search: sites that publish per-m² sale and rent prices for the area; every figure is shown with its source.
- Central Bank of Türkiye (TCMB): the regional house price index and rent index trend (annual change).
- Comparables you provide: paste the text or a screenshot of listings from other sites into the chat; the assistant extracts price, m² and rooms and includes them.
If the same area was researched before, the result comes from the area database in a few seconds (treated as current for up to 30 days); spelling variants (e.g. "Moda" and "Moda Mah.") count as the same area.
PDF Report
- The Open report link under the answer opens an A4 report with your agency name; use your browser's Print > Save as PDF to send it to your client.
- The report includes the source table, ranges, yield and source links. For security the link is valid for a short time; ask for the analysis again if needed.
- You can also run it without the assistant: the Market analysis button at the top of the property form, above the tabs, opens the report in a new tab using the province, district, type, rooms, m² and price in the form (it works before saving too).
Important: The result is an estimate based on listings and open data; it is not a licensed (CMB/SPK) valuation report and cannot be used for official transactions. Present it to your client as such.
2.3. Smart Matching
Matches customer requests and your portfolio in both directions. Ask the Pro Assistant: "Which listings suit Ayşe Kaya?", "Which customers suit this flat?" or just criteria: "Kadıköy, 3+1, for sale up to 8 million".
- Each result comes with a 0-100 match score and the reason (e.g. "8% over budget", "one room fewer").
- Close options are included: listings slightly over budget (up to 20%), with one room fewer or in a neighbouring district are listed with a lower score, so you never lose a client to "nothing matches".
- Listing type (sale/rent), property type and province must always match.
- If the customer's request is only written in the notes, the assistant extracts the criteria from the notes.
3. Properties
This is the master record of your portfolio. It is managed from the Properties → All Records list; the New Property form has the following sections:
- Basic Information — title, description, price (currency can be chosen; the TL equivalent is calculated with the selected TCMB rate), property type, listing type (for sale/for rent) and status.
- Location — province/district selection and address. When you enter the address, the map drops a pin at the estimated location automatically; correct it by dragging the pin, clicking elsewhere on the map or typing the latitude/longitude (dot or comma accepted). If the address changes, use Locate from address again. The coordinates are used on the listing map and in the 3D aerial view.
- Building Details — number of rooms/bathrooms/balconies, floor, building age, net/gross m², heating, facing, furnished/eligible for mortgage/open to swap flags, maintenance fee and deposit.
- Title Deed Information — deed province/district/neighborhood, block/parcel/sheet, deed area, unit, deed type (condominium ownership, construction servitude, land deed, shared ownership), land share, deed date and expense amount.
- Valuation — appraisal value and date, expected sale price; the price per m² is calculated automatically.
- Documents — typed files such as the title deed, DASK (earthquake insurance) policy, appraisal report, occupancy permit and energy performance certificate (PDF/Word/Excel/text).
- Photos — accepts image formats only (JPG, PNG, WebP…); uploads are listed with small previews, and you choose from them when publishing a listing.
If the approval workflow is on, the record goes to Pending Approvals and is not added to the portfolio until an authorized user approves it (Section 11). Edits and deletions follow the same workflow.
3.1. 3D Aerial and Street View
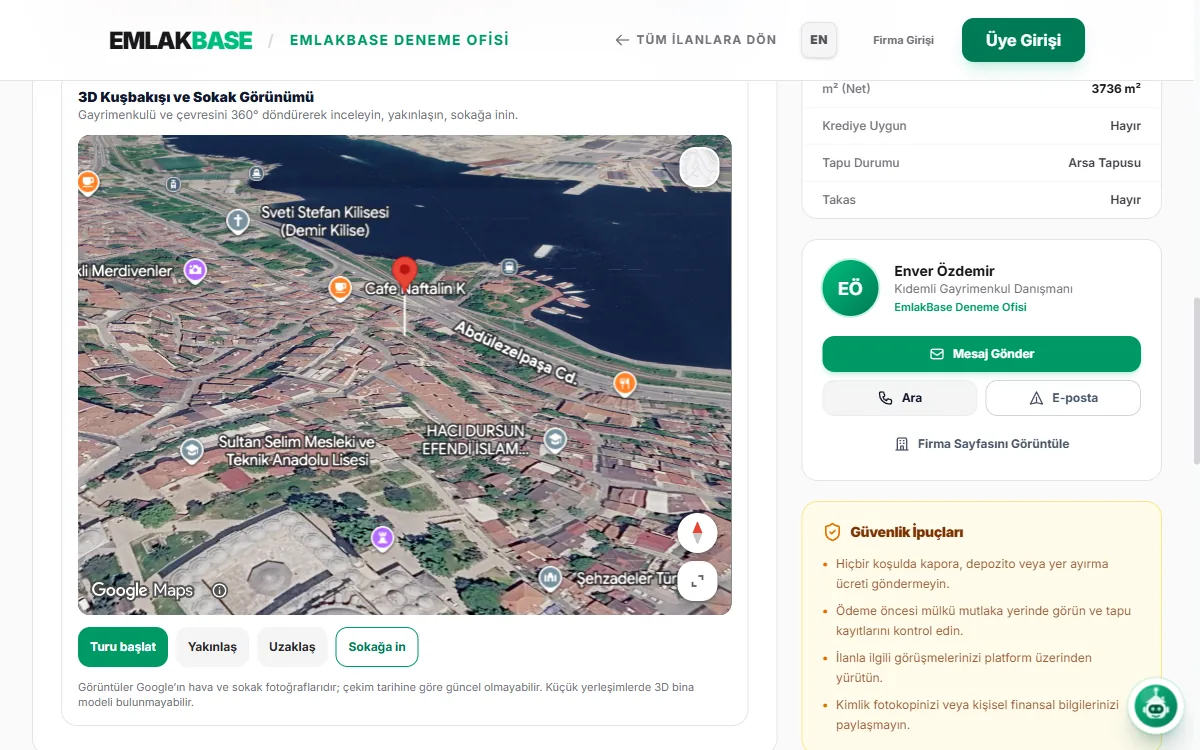
For every property with coordinates, an Open 3D aerial view button appears on the Location tab of the public listing page and on the edit page in the panel. The property and its surroundings open on a photorealistic 3D city model.
- Start tour: the camera circles the building 360°; stop it at any time.
- Zoom in / Zoom out, or rotate with the mouse or your finger for a close look.
- Street level: switches to the nearest street view, facing the property. A notice appears where there is no street view.
- The map loads only when you press the button, so it does not slow down the page.
Imagery is Google aerial and street photography and may be out of date. 3D building models exist in most large cities; small towns fall back to satellite view. The imagery is not altered or exported; check the property's coordinates for the right location.
4. Listings and Publishing
Publishing Channel
On the Listings → Publish New Listing screen, you first choose a property, then the EmlakBase publishing channel:
- Draft — visible only in the panel, not published anywhere.
- Agency Page — published on your agency's own website (shown only in plans that include the agency website — Pro+/Max).
- Public + Agency — appears both on your agency page and in the EmlakBase public listings.
The options depend on your plan: in plans without the agency website (Basic/Pro) the "Agency Page" card is not shown at all, and the public option is offered as "EmlakBase Listings".
Platform Publishing (Optional)
Under Settings > Integrations, more than 20 platforms are listed: Sahibinden, Hepsiemlak, Emlakjet, Emlak Sitem, Gaboras, HangiEv, Emlak24, Endeksa, and international platforms in the ListGlobally network. For platforms that work with XML, you just give your feed address to the platform; for API platforms, you enter your key or open a setup request and our team sets up the connection on your behalf. Connected platforms can be selected in the listing form and on the Listings screen; platform selection appears in plans that include platform integration: Sahibinden, Hepsiemlak and Emlakjet on Pro+, all platforms on Max.
Choosing Listing Photos
When a platform is selected, the property's existing photos are listed with small previews; you pick which ones to publish with the listing (default: all selected).
Visitor Side
On public listing pages, visitors can filter listings with the same filter set as the major listing sites (location, category, transaction type, price and m² range, number of rooms, building age, floor, heating, bathrooms, furnished, eligible for mortgage, price reduced, listing date, features, usage and deed status — the filter is carried in the URL as a shareable link), add listings to favorites with the heart icon (stored on the device, no account needed), and use the photo gallery, map, agent card (show phone / WhatsApp) and share/print actions on the listing details page.
5. Customers (CRM)
Keep your buyer, seller, tenant and landlord records in a single list. Each record has a full name, phone, email, customer type and notes; if you enter a Turkish ID / tax number, it is validated with the official algorithm.
- Records follow the approval workflow (if on) — additions, updates and deletions go through approval.
- With Bulk Import, download the CSV template and upload hundreds of customers at once (Section 13).
- The contract wizard uses these records when selecting parties.
- The Pro Assistant's Smart Matching finds listings for a customer or customers for a listing (Section 2.3).
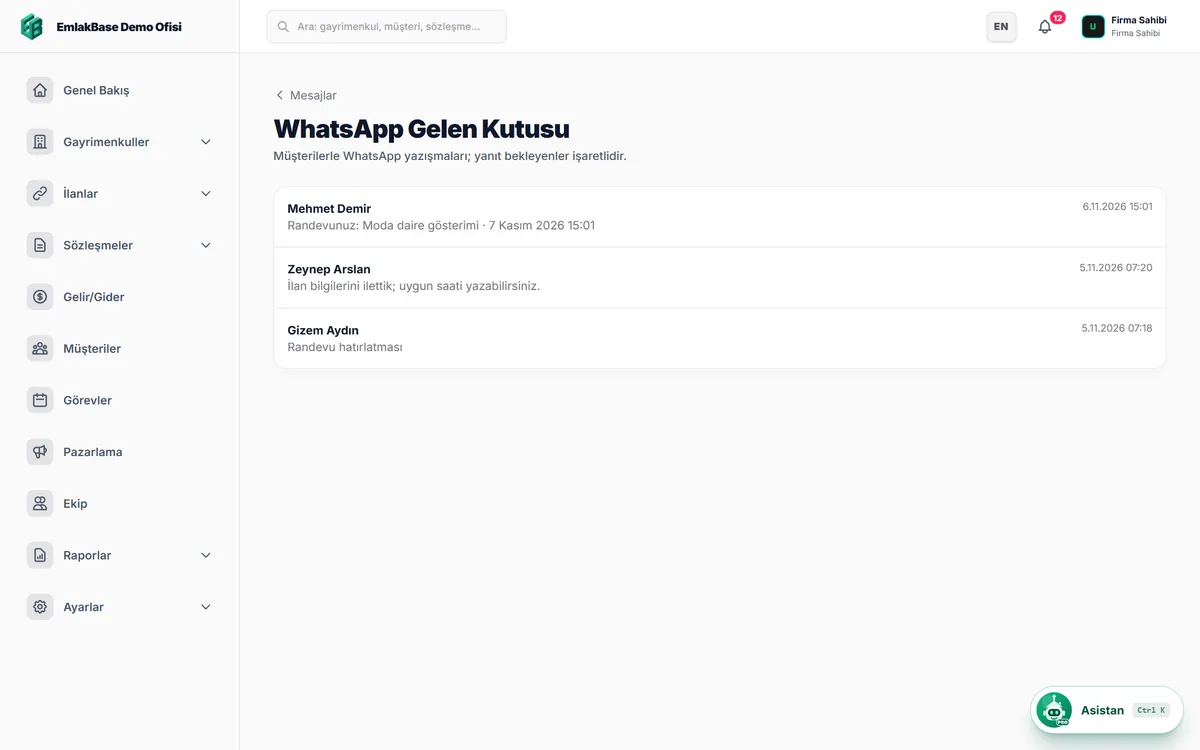
5.1. WhatsApp Business
Included in the Pro+ and Max plans. Connect your agency's own Meta WhatsApp Business account under Settings > Integrations > WhatsApp; the steps to complete on the Meta side are listed on the same card. The Quick Demo account cannot connect.
- Incoming messages — anyone who writes to your number becomes a customer record automatically, the message appears on the customer page and the agent is notified.
- Inbox — Messages > WhatsApp shows the latest message per customer; those waiting for a reply are marked.
- Chat — reply from the WhatsApp panel on the customer page.
- One-tap listings and appointments — pick a listing or appointment in the panel; the customer receives a card with an image and a link button instead of a long address.
- After-hours assistant — when turned on, it sends a short reply on behalf of your agency to messages received outside working hours. It stays silent if an agent wrote to that number in the last 24 hours or the number's daily cap is reached.
- Staff notifications — staff can choose to receive new message alerts on WhatsApp under Settings > My Account.
The 24-Hour Rule and Templates
Once 24 hours have passed since the customer's last message, Meta does not allow free-form text; only approved templates can be sent. To send listings and appointments outside the window, get eb_listing_share and eb_appointment_link approved by Meta, along with eb_staff_notification for staff alerts, and register them under Settings > Integrations > WhatsApp. The window reopens when the customer writes again.
EmlakBase charges nothing extra for this integration; any message fees Meta applies go directly to your Meta account.
6. Contract Wizard
In the Contracts module you can generate 5 types of contracts from ready-made legal templates. The wizard goes step by step: type → property → parties (from customer records) → financial terms → preview.
- Lease Agreement — amount written out in words, fixtures list, increase index (Turkish Code of Obligations, art. 344).
- Sale (Down Payment) Agreement — block/parcel details, down payment and withdrawal terms.
- Mandate — authorization to sell/rent.
- Eviction Undertaking — compliant with Turkish Code of Obligations art. 352/1.
- Commission (Brokerage) Agreement — the amount and VAT are calculated automatically from the commission rate and written out in words (Turkish Code of Obligations, arts. 520-525).
The generated document can be printed or saved as PDF. Active contracts and the archive are kept on separate tabs; contract records follow the approval workflow. Besides the wizard, you can also create a record with the New Contract form: if you are not allowed to save without approval, the button becomes "Submit for Approval" and the record goes to Pending Approvals; once approved, it appears in the list.
7. Tasks and Appointments
Plan your showings, meetings and follow-ups in the Tasks module. Enter a task title, type, priority, due time and assignee; you can link a related property/customer.
- When a task is assigned to a team member, they get a bell notification and an email.
- Statuses: Pending → In Progress → Completed / Canceled.
- The list screen can be filtered by date and status.
8. Income / Expense
Track your commission income and agency expenses in the Income/Expense module. Entries have a type (income/expense), category, amount and currency; foreign currency amounts are converted to TL with the selected TCMB rate in reports.
- Entries follow the approval workflow (if on).
- The income card on the Overview and the Reports are fed by this data.
Commission Payouts
When you choose Agent Commission (Commission Split) as the category of an expense, the form asks who the payout goes to: if you choose Agency staff, the payment is recorded against that team member and totaled per person, monthly/yearly, in the Commission Report. There is no role restriction: anyone on the team can be selected, whether agency owner, manager, agent or a custom role (broker, accountant, etc.). If you choose External agent, you type the full name of the person who is not on the team as free text. When you mark a commission split as "Paid", the expense entry it creates is also linked automatically to the team member who owns the share.
8.1. Listing Quota and Publishing Period
In EmlakBase, how many listings you can keep live at the same time and how long a listing can stay live depend on your plan. The model works like the packages on real estate platforms:
- Basic — 25 listings, 45 days
- Pro — 100 listings, 60 days
- Pro+ — 250 listings, 75 days
- Max — 1,000 listings, 90 days
- Demo (30-day trial) — 10 listings, 30 days
These numbers are not fixed: EmlakBase management may update plan contents (price, number of users, listing limit, publishing period and enabled modules); changes are reflected directly on the pricing page and in your quota in the panel.
The quota counts only live listings; your draft portfolio records are unlimited. When the quota is full you cannot publish a new listing — you can move a live listing to draft and publish a new one in its place, or upgrade your plan. You can see your remaining allowance on the Settings > Subscription screen and in the listing form.
Every night, listings whose publishing period has ended are automatically moved to draft, and the user who added the listing gets a panel notification. If your quota allows, you can republish the same listing with one click; the period starts over. The "Live" column in the property list shows the days remaining for each listing, and turns to a warning color in the final week.
9. Marketing
Social Media Image
Pick a property from your portfolio and create a share image from ready-made templates; download the image and use it on your social accounts.
Poster & Banner Studio
Prepare print-ready output for a shop window, building facade or land plot right from the panel. When you choose the listing to promote, the template library opens and each template is drawn with your listing's real details:
- Simple sign — the simplest output: a huge FOR SALE/FOR RENT sign, phone and/or QR.
- Corporate frame — a classic framed agency poster with listing details.
- Photo showcase — a large property photo on top, info panel below.
- Minimal white — a clean layout with plenty of white space that highlights the price.
- Bold banner — giant headline and large phone number; readable from across the street.
- Luxury dark — dark background with gold accents; for high-end listings.
- Window card — a landscape card; lined up in a row in the shop window.
For print size you can choose A4 portrait/landscape, A3 portrait, 70×100 and 100×150 banners, or an A5 window card, and use one of five print-friendly color themes. You decide what appears on the poster: photo, price, details, headline, QR code, agency logo, agent name, phone and email can each be turned on or off. If you hide the price, you can write a text such as "Call for Price" instead, or leave this field empty to remove the price entirely. The QR code leads to the listing's details page on EmlakBase, so the listing must be live for a poster with a QR code.
Use Print / Download PDF to get the output. In the print dialog, "Background graphics" should be on and margins set to "None". Banner sizes are scaled to fit an A3 page without changing proportions; the print shop enlarges this PDF when printing. This feature is available on the Pro+ and Max plans (and can also be tried in the 30-day Demo account).
Bulk Email Campaign
Send real email campaigns to your customer list (up to 500 recipients per send) by writing a subject and content. This feature is available on Pro+ and higher plans, only for the Agency Owner and Manager roles. SMS campaigns are on our roadmap.
9.1 AI Content & One-Click Sharing
Content Generation with AI
The Marketing module and AI content generation are included in Pro and higher plans (the Basic plan has no AI). AI is available in four places, and all of them use only the listing's real details (no made-up features):
- Listing description — the "Write with AI" button on the property form generates a fluent description from the fields filled in so far; edit it as you like and save.
- Social media post — choose a platform on the Marketing page (X, Instagram, Facebook, LinkedIn); ONE post is generated per platform, with the listing link included in the text.
- Poster headline — in the Poster studio, "Suggest Headline with AI" brings three short suggestions; click the one you like.
- Campaign content — in the customer newsletter, write your goal in one sentence (such as "announce new listings"); a subject + body is generated for email, and a short text for SMS.
Generations are saved: a post, poster headline or campaign content generated for a listing is stored, and when you choose the same listing again the saved version is loaded — AI does not run again unless you click Regenerate.
Daily AI allowance: each plan has a daily generation allowance (Pro 5, Pro+ 15, Max 30; current values are on the pricing page). Each "generate" click uses 1 credit; loading saved content does not use credits, and a failed generation refunds the credit. The allowance resets every day at 00:00 (Turkey time); the remaining allowance is shown in the Marketing page header and next to the "Write with AI" button on the property form.
One-Click Sharing — App Setup
The Share button on the Marketing page posts to your account through your agency's OWN developer app. To use it, create an app once on each platform, enter its Client ID/Secret under Settings → Integrations → Social Media Sharing Connections, and connect your account. You will copy the Redirect URI field there and paste it into the platform's app settings.
X (Twitter) — step by step
- 1. Sign in to developer.x.com with your agency's X account and enable free developer access.
- 2. Create a Project + App.
- 3. In the app settings, go to User authentication settings → Set up: choose "Read and write" permissions and the "Web App, Automated App or Bot" app type.
- 4. Paste the Redirect URI from EmlakBase into the Callback URI field, and your website address into the Website field.
- 5. Copy the Keys and tokens → OAuth 2.0 Client ID and Client Secret values, save them in EmlakBase and click Connect Account.
LinkedIn — step by step
- 1. linkedin.com/developers → Create app. (LinkedIn asks you to link the app to a company page; posts still go to your personal profile.)
- 2. On the Products tab, add "Share on LinkedIn" and "Sign In with LinkedIn using OpenID Connect" (both are enabled instantly, without review).
- 3. On the Auth tab, add the Redirect URI from EmlakBase as a Redirect URL.
- 4. Save the Client ID and Client Secret in EmlakBase and connect the account.
Instagram — step by step
- 1. Switch your Instagram account to a Professional (Business) account and link it to a Facebook Page — this is the only way to post through the API.
- 2. developers.facebook.com → Create App → choose Business as the type.
- 3. Add the Facebook Login for Business product to the app; paste the Redirect URI into the Valid OAuth Redirect URIs field in its settings.
- 4. Save the App ID / App Secret values under Settings → Basic in EmlakBase and connect the account.
- 5. Note: while the app is in "development mode", only accounts that are admins of the app can post — this is enough for the agency's own account. Instagram posts must include an image; EmlakBase uses the listing's share card as the image.
One-click sharing to Facebook Pages is not supported; copy the text generated for Facebook and post it on your page. Your connection keys are stored encrypted, and the Client Secret is never shown again after it is saved.
10. Reports
- Sales Reports — sales/rental performance and revenue charts by period.
- Contract Reports — contract breakdowns by type and status.
- Performance — record and conversion comparisons per agent.
Every report screen has a period filter; the tables under the charts can be exported as CSV.
11. Approval Workflows
How Does It Work?
In a module with the approval workflow on, a user who adds/updates/deletes a record Submits it for Approval. The request goes to the Approval Center (the bell in the top bar) of users with approval rights. The approver reviews the request and Approves, Returns it (sends it back with a reason for correction) or Rejects it. A returned request can be edited and resubmitted by the person who started it. The history of every request is kept in Workflow History, with a before/after comparison of the data.
Workflow Settings
- Use approval workflows in the agency — a single switch that turns all workflows on/off.
- Modules Using Workflows — workflows are mandatory in checked modules; unchecked ones save directly.
- Timeout — requests with no decision within the set number of days are closed automatically.
Role-Based Privileges
In the role matrix (Section 12), a role can be given save without approval and approve rights per module. The Agency Owner has all permissions.
12. Team and Roles
Invitations
Send an invitation from the Team screen by choosing an email and a role; the invitee receives an invitation link by email (the link is valid for 7 days) and joins the panel directly by setting their full name and password on that link. Team size is subject to your plan's user limit (pending invitations count too); when the limit is reached, you are asked to upgrade your plan.
New agencies come with Agency Owner / Manager / Agent / Assistant roles preset with sensible starting permissions: the Manager has full rights in all modules, the Agent works on portfolio, listings, customers and contracts (no delete rights, finance is read-only), and the Assistant is mostly view-only. You can change these defaults as you like in the Permission Matrix.
Roles and Permission Matrix
Preset roles: Agency Owner, Manager, Agent, Assistant; you can also create your own roles. For each role, the permission matrix sets view, add, update, delete, file upload and export permissions per module, plus the approve / save without approval privileges. Modules without view permission do not appear in the user's menu at all.
13. Lists and Tables
All module lists share the same set of capabilities:
- Filtering and Search — keyword + module-specific criteria; Advanced Criteria reveals extra fields. On phones the filter panel starts collapsed; it opens with the Filter button and closes by itself after you run the query.
- Phone view — on narrow screens, tables are listed as cards: a title, field/value pairs and action buttons at the bottom of the card; no horizontal scrolling needed.
- Sorting — click a column header to cycle through ascending/descending/off.
- Page size — 5 / 10 / 15 / 20 / 25 / 50 row options.
- Download CSV (top button) — downloads all filtered records; Excel-compatible.
- Right-click menu — copy a cell/row, sum a numeric column, download only the rows visible on screen as CSV.
- Bulk Import — in the property, customer and contract lists, download the CSV template, fill it in and import records in bulk; each row is validated, errors are reported and your workflow settings are respected.
14. Agency Website
On the Pro+ and Max plans, your agency gets a ready-made showcase website at agencyname.emlakbase.com: your listings with the "Agency Page" or "Public + Agency" channel are listed with filters, and each listing has a rich details page.
On the Max plan, the panel itself is also reachable at agencyname.emlakbase.com/dashboard — your team works from an address under your own brand.
15. Settings and Security
- Your Subscription — current plan, user limit and (on Demo) the trial end date.
- Agency Information — agency name, tax/ID details.
- Personal Information — full name, phone and profile photo.
- Delete My Account — agents and managers can close their own accounts from the Danger Zone under Settings > My Account: you confirm by typing your full name; the property, customer, contract, task and approval records you created are not deleted but transferred to the agency owner. The agency owner cannot delete their account alone; to close the business, use Delete Business on the Subscription page (confirmed by typing the agency name; all team members and data are removed).
- Financial Settings — the Use Exchange Rates switch: if you turn it off, all price/amount fields work in TL only (currency selection, rate multiplier and the exchange rate strip in the top bar are hidden entirely). If it is on, you choose the TCMB rate type (forex/banknote, buying/selling); the top bar and all currency conversions follow this choice.
- Security — Change Password — under Settings > Security. You are first asked for your current password, then for a 6-digit code sent to your email; the code is required even if you have not turned on two-step verification. When the password changes, sessions on all devices are signed out and you sign in again with your new password. For member accounts, the same flow is on the "My Account" page.
- Security — Two-Step Verification — off by default. To turn it on under Settings > Security, scan the QR code with Google Authenticator, Authy or 1Password and confirm with the 6-digit code from the app. While it is on, this code is required at every sign-in; without it there is no access to the panel, the mobile apps or agency data. Turning it off also needs a code; if you lose your authenticator app, the support team resets it.
Agency-wide settings (General/Financial/Workflow/Integration) can only be changed by the Agency Owner and Manager by default; the Agency Owner can delegate this right by giving a role the System Settings → Update permission in the Permission Matrix.
Your sign-ins are also protected: after 3 failed attempts in a row, a robot check (CAPTCHA) is required.
16. Notifications and Emails
Bell (Approval Center)
The bell in the top bar has two parts: Approval Center — lists only the modules you can approve, with pending request counts; users without approval rights do not see these rows. My Requests is open to everyone regardless of approval rights — track the status of the workflows you started here. Notifications are individual notifications just for you; the red counter shows the total pending approvals.
For modules where workflows are turned off entirely or per module in Workflow Settings, the "Pending Approvals" menus and Approval Center rows are not shown.
When Are Emails Sent?
- When a workflow is started → to users with approval rights.
- When a request is approved / returned / rejected → to the person who started it (with the reason).
- When a task is assigned to you → to the assignee.
Emails are sent on behalf of your agency through EmlakBase's infrastructure; remember to check your spam folder.
17. Frequently Asked Questions
Will my data be deleted when my demo ends?
No. The panel is locked but your data is kept; when you pick a plan, everything is right where you left it.
Can I use approval workflows in only some modules?
Yes — check modules one by one in Workflow Settings; unchecked modules work without workflows.
Can I publish a listing without sending it to a platform?
Yes. Platform selection is optional; you can use only the EmlakBase publishing channel (agency page / public listings).
What happens to invalid rows in a CSV import?
Each row is validated individually; invalid rows are listed with their reasons, and valid rows are processed.
I forgot my password. What should I do?
Use the "Send a reset request" link on the sign-in screen to receive a password reset link by email.
What is the assistant in the bottom right corner?
It is the free EmlakBase Assistant, which works without signing in. It stays with you on the home, listing and guide pages and answers based on the page you are on: ask about a topic in the guide, search from the listings page or ask about the listing you are viewing. Questions are limited so that everyone gets fair use. It cannot see any agency's private data or demo data.
If the button covers something, press and drag it to move it, or drop it on the × target that appears in the middle of the right edge to hide it; on the tab that stays at the edge, the mascot opens the assistant and the arrow brings the button back.
What happens if my assistant allowance runs out?
There is no extra charge; the assistant pauses until the allowance renews and the rest of the panel keeps working. You can upgrade your plan for a higher allowance.
I lost my authenticator app. What should I do?
There is no access to the account without the code; write to our team through the Support Center, and the support team resets your verification.
How do I reach support?
From the Support Center you can open a bug report (free), a feature request, a suggestion or a complaint / content report (inappropriate listing, question or message); Max plan subscribers get a free small custom development each month.